
Minimalist DC Motor
Create motion with Electricity
In this project you will build a simple motor powered by Direct Current. It uses as few parts as possible, and is easy to build with common components. It is a fun demonstration of how electricity can be converted to motion, and of the interactions between electromagnetic fields.
Bill of Materials
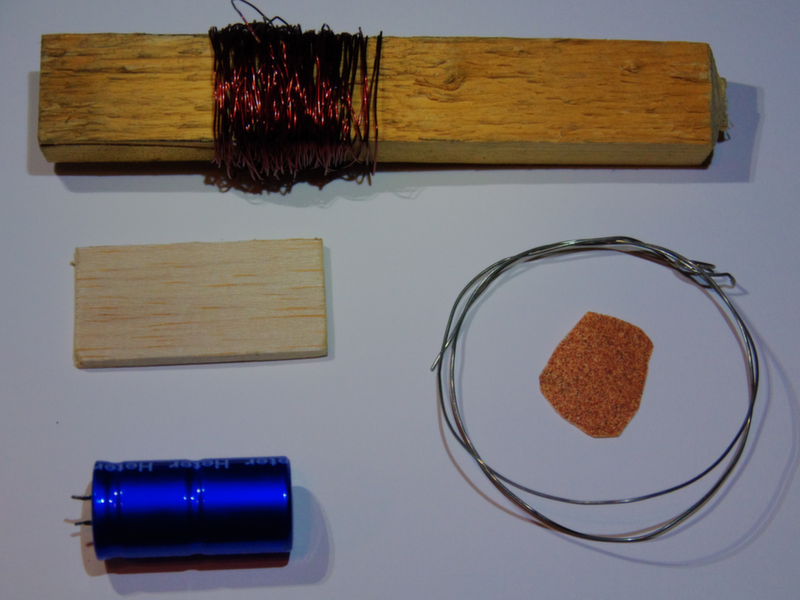
For this project you will need:
-
A NEODYMIUM MAGNET (NOT PICTURED): In this tutorial we used a 1/2" x 1/8" disc magnet, but it will also work well with a 1/4" x 1/4" or 1/4" x 1/2" rod magnet.
-
MAGNET WIRE (~10ft of ~22 AWG): Magnet wire is coated in a thin layer of varnish that insulates it; it can be salvaged from a transformer or motor, and for this project should be about 22AWG (American Wire Gauge), or just stiff enough to support itself when coiled.
-
WINDING FORM: This can be any cylindrical object around an inch in diameter, and the exact size is not crucial. This is what you will wind the coil around. I used a large capacitor because it had a slight groove in it, but a pill bottle or cardboard tube would work as well.
-
UNCOATED STEEL OR COPPER WIRE (~10"): This will be used to both get power to the coil and to support it, so it should be stiff and uncoated.
-
A PIECE OF SAND PAPER: Between 100 and 400 grit
-
WOODEN BASE: Balsa wood works well because it is easy to cut, but you can use any insulating material you’re comfortable working with — such as wood, plastic, or cardboard.
-
12V DC POWER SOURCE This motor is far from efficient, and if the wire you use is thick it will use as much power as it can get. A 1+ amp 12V DC adapter or bench power supply will work well.
Build it
Wind the coil
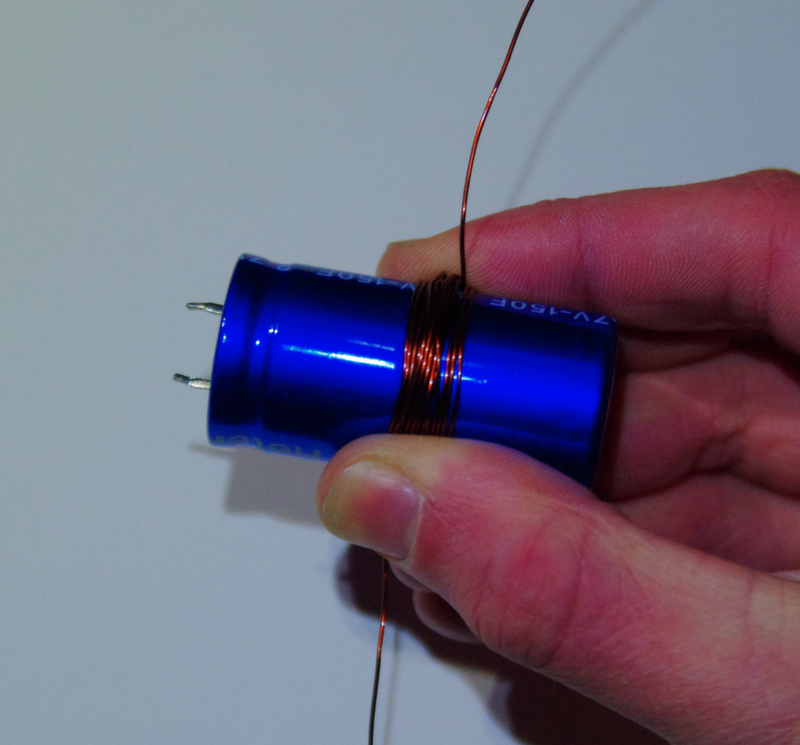
Wind about 15 turns of magnet wire onto your coil form, leaving a few inches of wire on either end of the coil. Unlike the Joule Thief’s Toroid, you don’t have to worry about overlapping turns on the coil — they might even make it more efficient.
NOTE: As you can see, the wire was quite bent up in the parts photo, because it was salvaged from an old motor. If you salvage wire, straighten it before winding the coil by looping it around some solid object (like the strut of a chair back), and pulling the two ends back and forth until the kinks are smoothed out. Just don’t use your Grandma’s antique chair, because it will put a notch in it.
Finish the coil
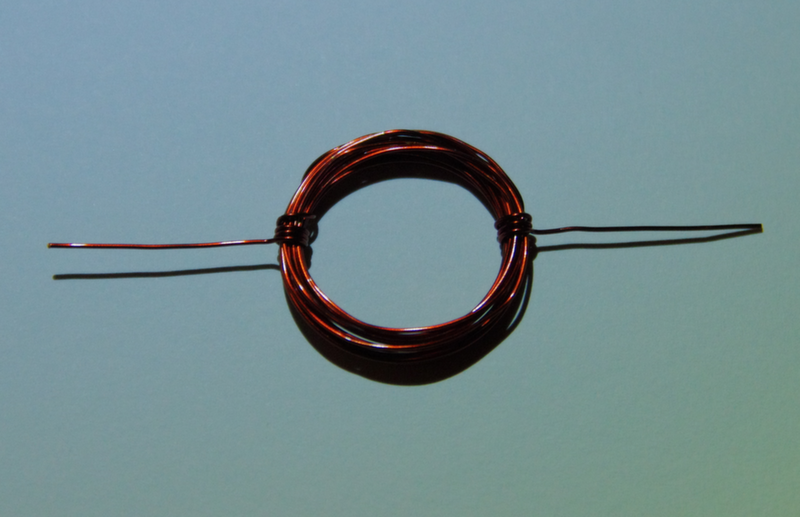
Carefully slide the coil off the form. Wrap each of the loose ends around the main bundle of wire a few times to hold it together. Make sure they come out directly opposite each other and are as straight as possible.
You have just made the Armature. I’ll continue calling it the coil because it is less technical, but don’t forget to pull out this handy buzzword when you explain it to someone.
Sand the wire
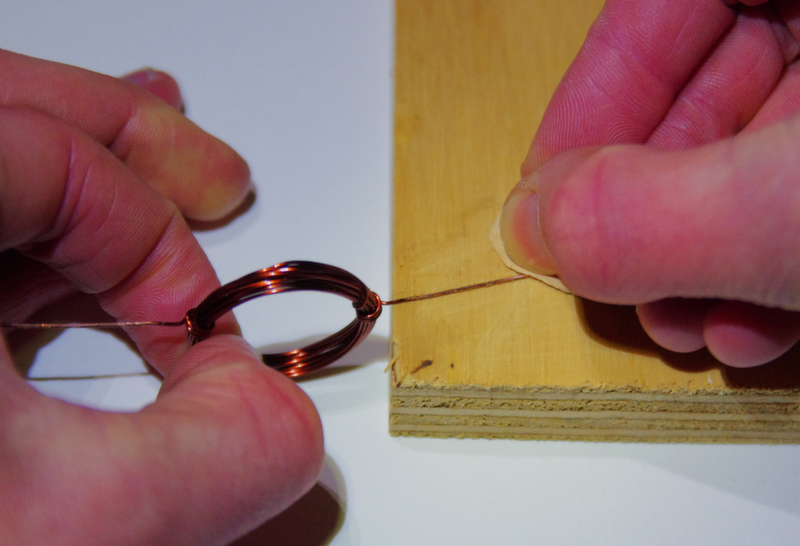
Place the coil as shown — vertically, with the side your’re working on supported — and sand the varnish off of only one side of each of the wires — make sure it is the same side for both wires. This is one of the most important steps to get right.
Note that you are sanding the varnish off one side the wire for its whole length, not sanding all the varnish off the wire for half of its length.
Make the Supports
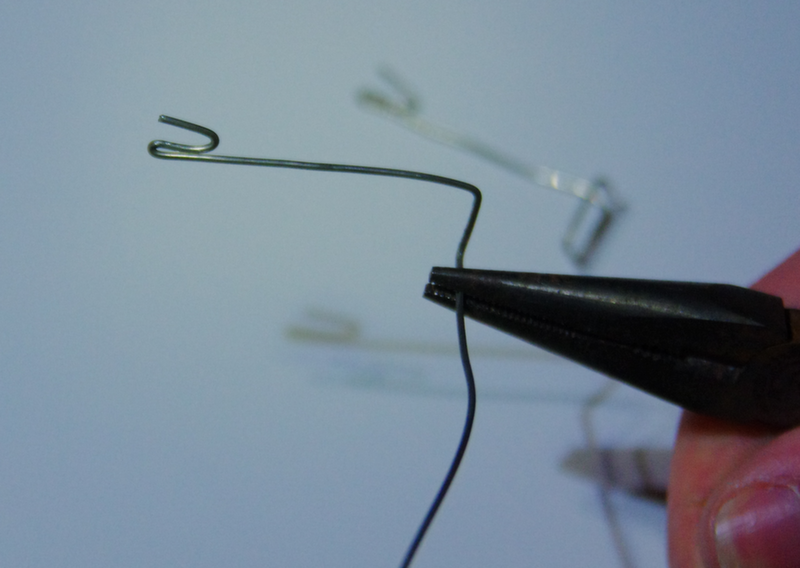
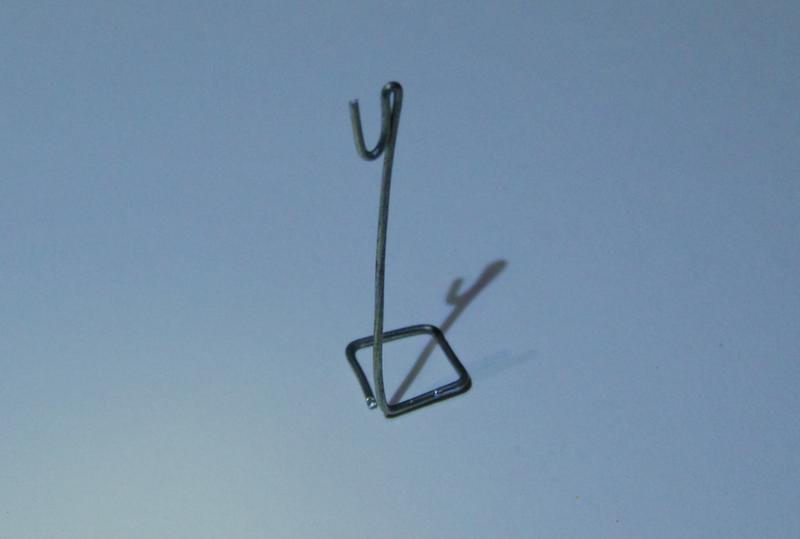
Cut two equal lengths of stiff steel wire. Bend small v-shaped cradles into one end to support the coil and get power to it, and bend horizontal squares into the other, so make it easier to glue it to the baseplate.
Attach the supports
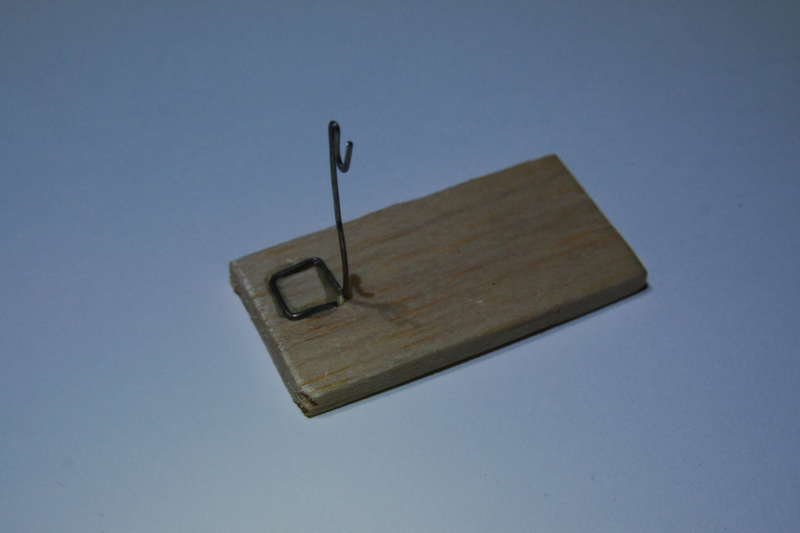
Glue the two supports so that the vertical part of the supports are across from each other — centred on the board in one direction, and about 1 1/2 inches apart in the other. Hot glue works well for this.
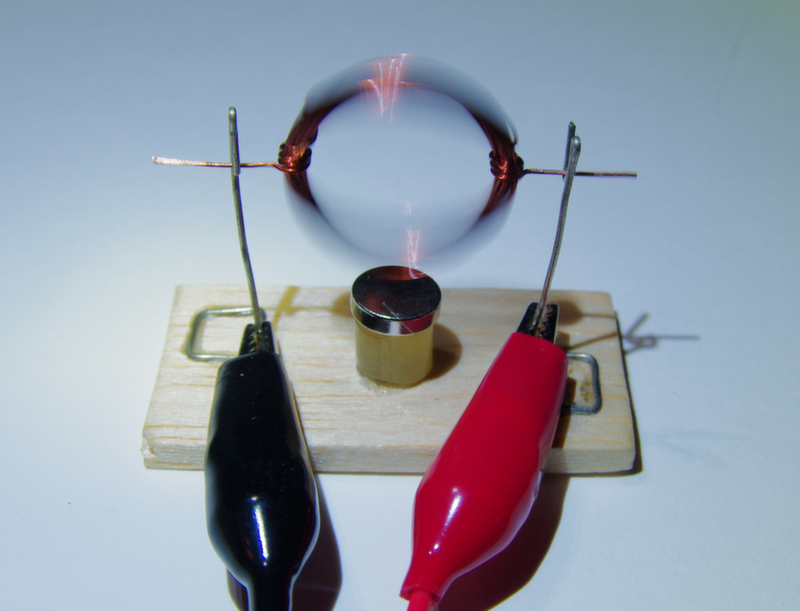
Attach the Magnet
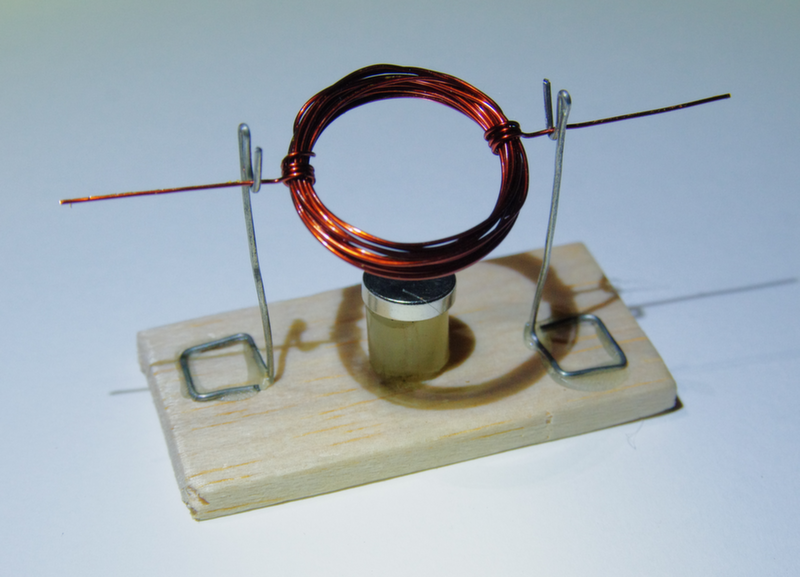
It is important to get the magnet as close to the coil as possible without it rubbing. Depending on how tall you made the supports, you may have to put a riser under the magnet — in the version pictured, I made the supports too tall, and used a section of hot glue stick to mount the magnet at the correct height.
It doesn’t matter what pole of the magnet is facing up for this project — which way the power is applied and which way the magnet is oriented will determine which way the motor spins.
Test it
Attach Power
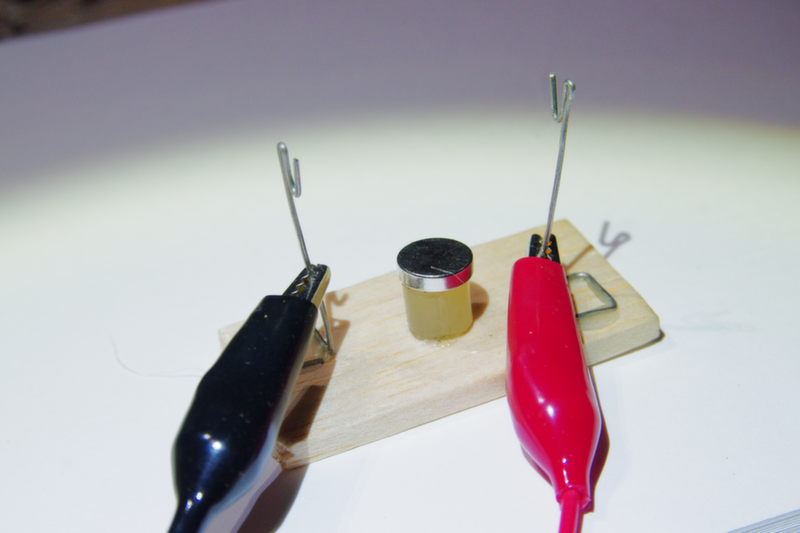
Clip test leads from your 12V DC source onto the vertical supports (or solder to them, or wrap wires around them. It doesn’t matter, but test leads are the most convenient.)
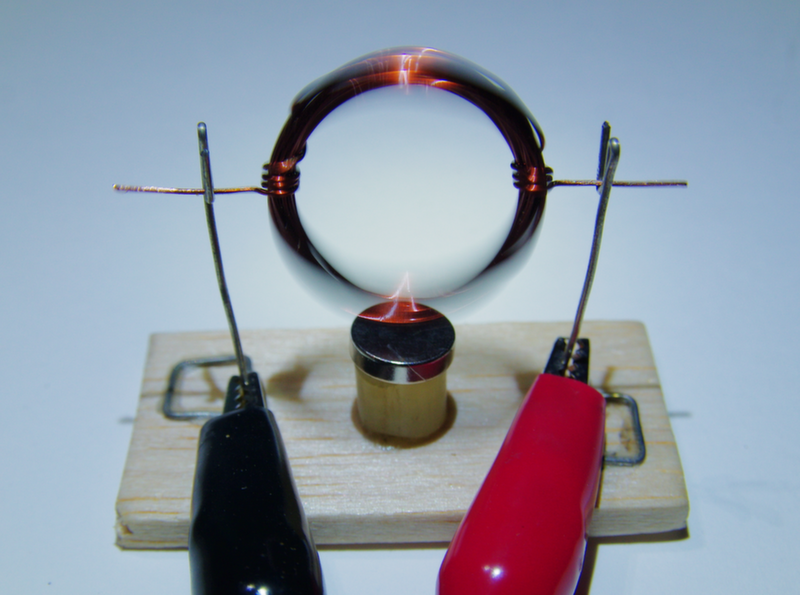
Fire it Up
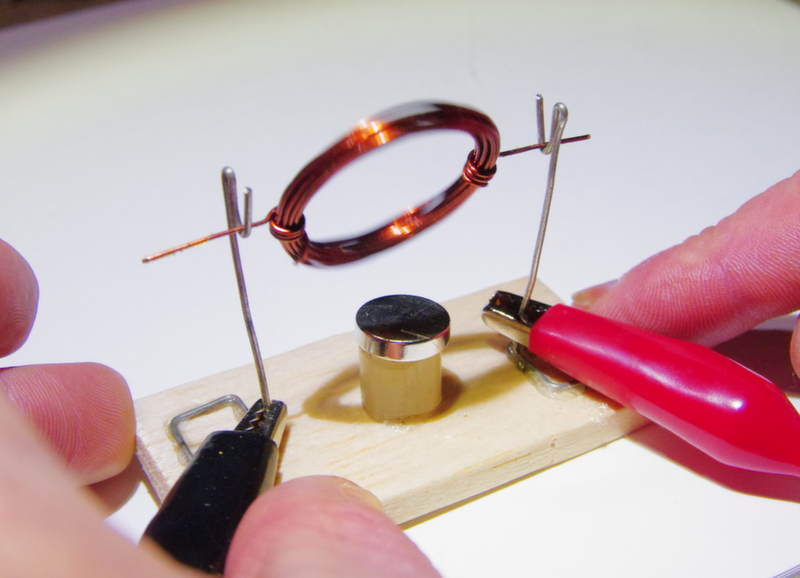
Place the coil in the cradle. Because of the way the wire is sanded, you will likely need to give it at little push to get it started.
The motor will want to spin in one direction, so experiment to see which way it turns, and give it its boost in that direction.
Fine Tune
To get the best performance, you will need to tune the motor in the following ways.
- Make sure that the coil wires are perfectly straight and that the coil spins easily in the cradle.
- When it is running, watch which way the coil migrates. If one vertical support is higher, it will drift to the other side. Adjust the supports’ height so that the coil remains centred between them when it’s running.
- Adjust the sanding job Make sure that the side which has the varnished removed has it all the way removed and extends half way around the wire (or maybe a little bit more), and that the side with the varnish still on is fully coated.
Your’re done!
Troubleshooting
If the motor doesn’t run, it is most likely from one of these causes:
- The coil wires aren’t straight enough This will make it harder for the coil to spin. Adjust them as necessary.
- Your power source is too weak. This is a power hungry motor, and it is possible that (combined with other factors) a weak power source could make it not run. Make sure your power source is delivering at least 12V DC at 1+ Amp.
- Not enough of the varnish is removed. You may need to sand slightly more than half of the varnish off for optimum performance.
A Technical Digression
Essentially what is happening is this:
- The part of the wire with the varnish removed comes in contact with the support, and delivers power to the coil
- The powered coil is repulsed by the magnet, and starts to spin so that it is farther away from it.
- As it spins, the half of the wire with the varnish still on comes in contact with the support, cutting power to the coil. This means that the coil can finish its rotation using its momentum without being repulsed as the coil approaches the magnet.
- After the coil is past the magnet, the unvarnished half of the wire comes in contact, activating the coil. The cycle repeats.
Read more here:
- History of the Electric Motor
- DC Motors on Wikipedia
- Brushed DC Motors on Wikipedia